搭建Keepalived Nginx高可用Web集群 |
您所在的位置:网站首页 › keepalived nginx 3台集群 › 搭建Keepalived Nginx高可用Web集群 |
搭建Keepalived Nginx高可用Web集群
|
操作场景
虚拟IP(VIP)主要用于弹性云服务器的主备切换,达到高可用性HA(High Availability)的目的。当主服务器发生故障无法对外提供服务时,动态将虚拟IP切换到备服务器,继续对外提供服务。 本文档以弹性云服务器的CentOS 7.4 64位操作系统为例,实现Keepalived+Nginx高可用WEB集群搭建。 背景知识WEB集群是由多台Web服务器主机相互联结而形成的一种服务器体系结构,一般结构主要由负载均衡器和后端多个Web节点组成。用户访问请求首先进入负载均衡器,由它根据负载均衡策略将请求分配给后端某个Web应用节点。 本文档采用Nginx实现负载均衡。 网络拓扑数据规划如下: 表1 数据规划序号 产品 数量 规格 1 虚拟私有云(VPC) 1 192.168.0.0/16 子网(subnet) 1 192.168.0.0/24 2 弹性云服务器(ECS) 2 1vCPUs 1GB CentOS 7.4 64bit 子网IP(subnet IP) 2 ecs-HA1:192.168.0.10 ecs-HA2:192.168.0.20 3 弹性公网IP(EIP) 1 122.xx.xx.189 虚拟IP(VIP) 1 192.168.0.100 实现方式如下: 将2台同子网的弹性云服务器配置Keepalived,一台为主服务器,一台为备份服务器。 将这2台弹性云服务器绑定同一个虚拟IP。 将虚拟IP与弹性公网IP绑定,从互联网可以访问绑定了该虚拟IP地址的主备云服务器。 图1 组网图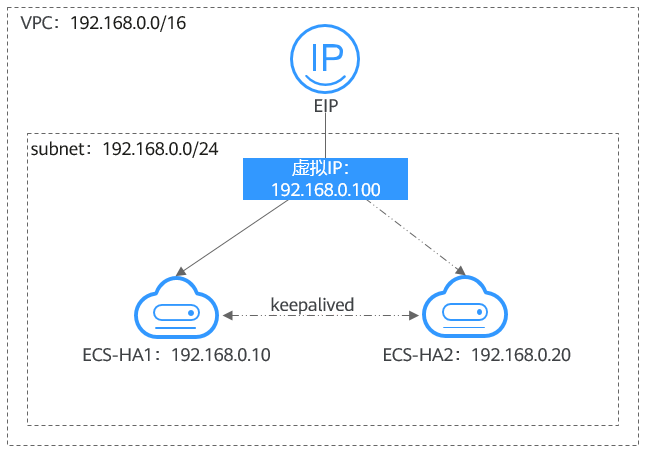
 实际环境按业务实际需要选择区域购买。
所有云资源须在同一区域。
操作步骤
实际环境按业务实际需要选择区域购买。
所有云资源须在同一区域。
操作步骤
本场景整体操作流程如下: 图2 配置流程 创建虚拟私有云和子网
登录管理控制台。
选择“服务列表 > 网络 > 虚拟私有云”。
单击“创建虚拟私有云”。
根据界面提示配置参数,请参考表2。
表2 配置参数
创建虚拟私有云和子网
登录管理控制台。
选择“服务列表 > 网络 > 虚拟私有云”。
单击“创建虚拟私有云”。
根据界面提示配置参数,请参考表2。
表2 配置参数
参数 示例 VPC名称 vpc-HA VPC网段 192.168.0.0/16 子网名称 subnet-HA 子网网段 192.168.0.0/24 单击“立即创建”。 申请所需云资源 购买弹性云服务器。 登录管理控制台。 选择“服务列表 > 计算 > 弹性云服务器”。 单击“购买弹性云服务器”。 在"购买弹性云服务器"页面,根据界面提示配置参数,请参考表1。 单击“立即购买”,购买弹性云服务器“ecs-HA1”和“ecs-HA2”。
此示例未选购数据盘,实际环境使用时请按业务需求选购数据盘,并切实考虑两个节点之间业务数据一致性问题。 (可选)配置安全组规则,确保两个ECS内网互通。此示例中两个ECS位于同一个安全组内,则默认内网互通,不需要执行本操作。 如果您的两个ECS如果位于不同的安全组内,那么需要分别在两个安全组的入方向规则中添加另外一个安全组ID,以确保两个ECS的内网互通,详细说明请参见不同安全组内的弹性云服务器内网互通。 图3 添加安全组规则 购买弹性公网IP。
登录管理控制台。
选择“服务列表 > 网络 > 弹性公网IP”。
单击“购买弹性公网IP”,根据界面提示配置参数。请参考表1。
申请虚拟IP地址。
登录管理控制台。
选择“服务列表 > 网络 > 虚拟私有云”。
在左侧导航栏选择“子网”。
在“子网”列表中,单击子网名称。
在“IP地址管理”页签中,单击“申请虚拟IP地址”,根据界面提示配置参数。
配置弹性云服务器环境
配置弹性云服务器ecs-HA1环境。
绑定弹性公网IP 122.xx.xx.189到ecs-HA1。
登录管理控制台。
选择“服务列表 > 计算 > 弹性云服务器”。
在弹性云服务器列表,单击弹性云服务器名称ecs-HA1。
单击“弹性公网IP”页签,并单击“绑定弹性公网IP”。
在"绑定弹性公网IP"页面,选择网卡和弹性公网IP后,单击“确定”。
通过SSH连接ecs-HA1,执行以下命令安装nginx、keepalived软件包及相关依赖包。
购买弹性公网IP。
登录管理控制台。
选择“服务列表 > 网络 > 弹性公网IP”。
单击“购买弹性公网IP”,根据界面提示配置参数。请参考表1。
申请虚拟IP地址。
登录管理控制台。
选择“服务列表 > 网络 > 虚拟私有云”。
在左侧导航栏选择“子网”。
在“子网”列表中,单击子网名称。
在“IP地址管理”页签中,单击“申请虚拟IP地址”,根据界面提示配置参数。
配置弹性云服务器环境
配置弹性云服务器ecs-HA1环境。
绑定弹性公网IP 122.xx.xx.189到ecs-HA1。
登录管理控制台。
选择“服务列表 > 计算 > 弹性云服务器”。
在弹性云服务器列表,单击弹性云服务器名称ecs-HA1。
单击“弹性公网IP”页签,并单击“绑定弹性公网IP”。
在"绑定弹性公网IP"页面,选择网卡和弹性公网IP后,单击“确定”。
通过SSH连接ecs-HA1,执行以下命令安装nginx、keepalived软件包及相关依赖包。yum install nginx keepalived -y 执行以下命令,编辑nginx配置文件并保存。vim /etc/nginx/nginx.conf 示例如下所示: user root; worker_processes 1; #error_log logs/error.log; #error_log logs/error.log notice; #error_log logs/error.log info; #pid logs/nginx.pid; events { worker_connections 1024; } http { include mime.types; default_type application/octet-stream; #log_format main '$remote_addr - $remote_user [$time_local] "$request" ' # '$status $body_bytes_sent "$http_referer" ' # '"$http_user_agent" "$http_x_forwarded_for"'; #access_log logs/access.log main; sendfile on; #tcp_nopush on; #keepalive_timeout 0; keepalive_timeout 65; #gzip on; server { listen 80; server_name localhost; #charset koi8-r; #access_log logs/host.access.log main; location / { root html; index index.html index.html; } #error_page 404 /404.html; # redirect server error pages to the static page /50x.html error_page 500 502 503 504 /50x.html; location = /50x.html { root html; } } } 执行以下命令,编辑index.html文件内容以演示访问效果并保存。vim /usr/share/nginx/html/index.html 示例如下所示: Welcome to ECS-HA1 执行以下命令,设置nginx服务开机自启动并启动服务。systemctl enable nginx systemctl start nginx.service Nginx单节点访问验证。 图4 ECS-HA1访问验证 执行以下命令,编辑keepalived配置文件并保存。
vim /etc/keepalived/keepalived.conf 示例如下所示: ! Configuration File for keepalived global_defs { router_id master-node } vrrp_script chk_http_port { script "/etc/keepalived/chk_nginx.sh" interval 2 weight -5 fall 2 rise 1 } vrrp_instance VI_1 { state MASTER interface eth0 mcast_src_ip 192.168.0.10 virtual_router_id 51 priority 101 advert_int 1 authentication { auth_type PASS auth_pass 1111 } unicast_src_ip 192.168.0.10 virtual_ipaddress { 192.168.0.100 } track_script { chk_http_port } } 执行以下命令,编辑nginx监控脚本并保存。vim /etc/keepalived/chk_nginx.sh 示例如下所示: #!/bin/bash counter=$(ps -C nginx --no-heading|wc -l) if [ "${counter}" = "0" ]; then systemctl start nginx.service sleep 2 counter=$(ps -C nginx --no-heading|wc -l) if [ "${counter}" = "0" ]; then systemctl stop keepalived.service fi fichmod +x /etc/keepalived/chk_nginx.sh 执行以下命令,设置keepalived服务开机自启动并启动服务。systemctl enable keepalived systemctl start keepalived.service 配置弹性云服务器ecs-HA2环境。 将弹性公网IP 122.xx.xx.189从ecs-HA1解绑定。 登录管理控制台。 选择“服务列表 > 计算 > 弹性云服务器”。 在弹性云服务器列表,单击弹性云服务器名称ecs-HA1。 单击“弹性公网IP”页签。 在弹性公网IP为122.xx.xx.189所在行,单击“解绑”。 绑定弹性公网IP 122.xx.xx.189到ecs-HA2。 登录管理控制台。 选择“服务列表 > 计算 > 弹性云服务器”。 在弹性云服务器列表,单击弹性云服务器名称ecs-HA2。 单击“弹性公网IP”页签。 单击“绑定弹性公网IP” 选择网卡和弹性公网IP后,单击“确定”。 通过ssh连接ecs-HA2,执行以下命令,安装nginx、keepalived软件包及相关依赖包。yum install nginx keepalived -y 执行以下命令,编辑nginx配置文件。vim /etc/nginx/nginx.conf 内容示例如下: user root; worker_processes 1; #error_log logs/error.log; #error_log logs/error.log notice; #error_log logs/error.log info; #pid logs/nginx.pid; events { worker_connections 1024; } http { include mime.types; default_type application/octet-stream; #log_format main '$remote_addr - $remote_user [$time_local] "$request" ' # '$status $body_bytes_sent "$http_referer" ' # '"$http_user_agent" "$http_x_forwarded_for"'; #access_log logs/access.log main; sendfile on; #tcp_nopush on; #keepalive_timeout 0; keepalive_timeout 65; #gzip on; server { listen 80; server_name localhost; #charset koi8-r; #access_log logs/host.access.log main; location / { root html; index index.html index.htm; } #error_page 404 /404.html; # redirect server error pages to the static page /50x.html error_page 500 502 503 504 /50x.html; location = /50x.html { root html; } } } 执行以下命令,编辑index.html文件内容以演示访问效果。vim /usr/share/nginx/html/index.html 内容示例如下: Welcome to ECS-HA2 执行以下命令,设置nginx服务开机自启动并启动服务。systemctl enable nginx systemctl start nginx.service Nginx单节点访问测试。 图5 ECS-HA2验证结果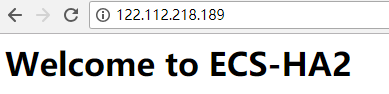 执行以下命令,编辑keepalived配置文件。
vim /etc/keepalived/keepalived.conf 内容示例如下: ! Configuration File for keepalived global_defs { router_id master-node } vrrp_script chk_http_port { script "/etc/keepalived/chk_nginx.sh" interval 2 weight -5 fall 2 rise 1 } vrrp_instance VI_1 { state BACKUP interface eth0 mcast_src_ip 192.168.0.20 virtual_router_id 51 priority 100 advert_int 1 authentication { auth_type PASS auth_pass 1111 } unicast_src_ip 192.168.0.20 virtual_ipaddress { 192.168.0.100 } track_script { chk_http_port } } 执行以下命令,编辑nginx监控脚本并添加执行权限。vim /etc/keepalived/chk_nginx.sh 内容示例如下: #!/bin/bash counter=$(ps -C nginx --no-heading|wc -l) if [ "${counter}" = "0" ]; then systemctl start nginx.service sleep 2 counter=$(ps -C nginx --no-heading|wc -l) if [ "${counter}" = "0" ]; then systemctl stop keepalived.service fi fichmod +x /etc/keepalived/chk_nginx.sh 执行以下命令,设置keepalived服务开机自启动并启动服务。systemctl enable keepalived systemctl start keepalived 绑定虚拟IP 将弹性公网IP 122.xx.xx.189从ecs-HA2解绑定。 将虚拟IP绑定到弹性云服务器ecs-HA1。 登录管理控制台。 选择“服务列表 > 网络 > 虚拟私有云”。 在左侧导航栏选择“子网”。 在“子网”列表中,单击子网名称。 选择“IP地址管理”页签,在虚拟IP所在行的操作列下单击“绑定服务器”。 在弹出的页面,选择ecs HA1服务器。 参考2将虚拟IP绑定到弹性云服务器ecs-HA2。 将虚拟IP绑定弹性公网IP 122.xx.xx.189。 登录管理控制台。 选择“服务列表 > 网络 > 虚拟私有云”。 在左侧导航栏选择“子网”。 在“子网”列表中,单击子网名称。 选择“IP地址管理”页签,在虚拟IP所在行的操作列下单击“绑定弹性公网IP”。 在弹出的页面,选择弹性公网IP 122.xx.xx.189。 单击“确定”。 验证结果 执行reboot分别重启ecs-HA1和ecs-HA2。 通过管理控制台远程登录到ecs-HA1。 执行以下命令,查看虚拟IP是否有绑定到ecs-HA1的eth0网卡上。ip addr show 如图6,表示虚拟IP已经绑定到ecs-HA1的eth0网卡上。 图6 查看ecs-HA1的虚拟IP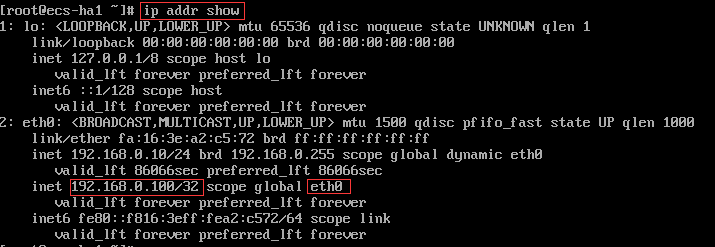 通过浏览器访问弹性公网IP,验证是否可以访问到ecs-HA1节点上的Web页面。
如图7所示,表示访问正常。 图7 访问验证ecs-HA1 执行以下命令,停止ecs-HA1上的keepalived服务。
systemctl stop keepalived.service 执行以下命令,查看服务器ecs-HA2是否有接管虚拟IP。ip addr show 图8 查看ecs-HA2的虚拟IP 通过浏览器访问弹性公网IP,验证是否可以访问到ecs-HA2节点上的Web页面。
如图9所示,表示访问正常。 图9 访问验证ecs-HA2
|
【本文地址】
今日新闻 |
推荐新闻 |